FREE UK DELIVERY ON ORDERS OVER £25
Replacing the exhaust valve and/or spring
Step 1 - Strip Down
Step 3 - Separate the Action
Step 2 - Remove the Trigger
Remove the magazine (making sure the gun is not cocked and is empty), remove the scope and scope mounts, remove the action from the stock (2 bolts underneath the stock), then remove the air cylinder (buddy bottle/tube).
Step 2 - Remove the Trigger
Step 3 - Separate the Action
Step 2 - Remove the Trigger

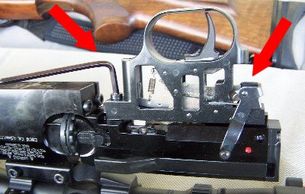
Remove the 2 hex head bolts that release the trigger mechanism - indicated by the 2 red arrows in the picture.
Step 3 - Separate the Action
Step 3 - Separate the Action
Step 4 - Remove Valve Housing

Remove the action connection bolts/screws and separate the action into two pieces.
Step 4 - Remove Valve Housing
Step 5 - Replace Spring & Seal
Step 4 - Remove Valve Housing

Remove the two bolts/screws hold the Valve Housing Insert in place to expose the inlet valve stem/pin and spring. When re-assembling, do NOT overtighten these screws.
Step 5 - Replace Spring & Seal
Step 5 - Replace Spring & Seal
Step 5 - Replace Spring & Seal

The original O-ring 2658 will have been a "crush fit", remove the valve & replace this oring with the one supplied in our kit. Making sure you give it a light coat of Molykote III.
Step 6 - Re-assemble
Step 5 - Replace Spring & Seal
Step 5 - Replace Spring & Seal
Re-assemble the gun - making sure you do not overtighten the screws to the Valve Housing.
Air Leaking Down the Barrel after Re-assembly?
The leak could be caused by low cylinder pressure if you fill your cylinder slowly or fit an empty air cylinder - the fix is to quickly introduce around 40 BAR into the cylinder. Because the valve spring alone does not apply sufficient pressure to complete the seal, it is aided by the regulated air pressure behind the exhaust valve. Also, be aware that some dive cylinders have restrictors already fitted into them that make the filling very slow. If this is the case, borrow someone elses cylinder, it really does work! WARNING: If you have an after-market aluminium cylinder, please be aware that it is not recommended that you fill it quickly due to safety reasons.
If the leak persists, you may need to polish the valve seat - CLICK HERE for a short video on how to fix an air leak down the barrel.
Copyright © HW100TUNING - All Rights Reserved.
This website uses cookies.
We use cookies to analyze website traffic and optimize your website experience. By accepting our use of cookies, your data will be aggregated with all other user data. Privacy Policy
